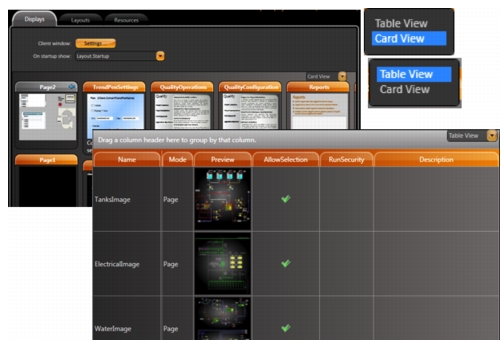
Column | Description |
Name | Read-only. Configured in Draw. |
Mode | Read-only. Configured in Draw. |
Preview | Read-only. Shows a thumbnail of the display. |
AllowSelection | Select to allow users to select the display from the PageSelector. |
EditSecurity | Select which types of users have access to edit this display. |
RunSecurity | Select which types of users have access to this display at runtime. |
Description | Enter a description for this display. |
 DRAW button.
 Column | Description |
Display Name | Enter a name for the display. |
Description | Enter a description for the display. |
iPad/iPhone iOS Target | Note: If you plan to use this display for iPad and iPhone users, be sure to select this option when you create the display. You cannot change it later. •Select to be able to use this display with iPads and iPhones. When you select this option, display settings in other parts of the Draw area only show options that are applicable to both Windows and iPads/iPhones. •Select the default view for iPad and iPhone users: •Landscape •Portrait |
Column | Description |
Mode | Select the type of display you want to create: •Page—Default. Opening a page automatically closes the last page on the current layout and displays in the area last in the list on Displays > Layouts page. Only pages display in the layout. •Popup—A popup opens on the top of all other displays. When you open a new page, by default, all popup displays are closed. Controls on other displays are available. •Dialog—A dialog opens as a modal dialog, which disables the controls on all other open displays until you close the dialog. Clicking OK executes the OnOK method on the display CodeBehind. |
Background | Select the background color for the display. |
Width | Enter the width of the display, in WPF units (device-independent pixels). Be sure to take into account the size of the layout. |
Height | Enter the width of the display, in WPF units (device-independent pixels). Be sure to take into account the size of the layout. |
Border | Select the type of border. |
CloseButton | Select to display Close button. Available only for Popups and Dialogs. |
Animation | Select the type of animation to use when displaying this display. |
Show on PageSelector Object | Select to include this display in the page selector that lets users go directly to a different display in the application. |
iPad/iPhone iOS target | Read-only. Shows whether you selected the iPad/iPhone iOS Target option when you created the display. |
Placement | Select where on the layout you want to place the display. Available only for Popups and Dialogs. |
Target | Select whether the display appears relative to the mouse position or relative to whole window. Available only for Popups and Dialogs. |
DialogButtons | Select the buttons you want on the dialog. Available only for Dialogs. |
Title | Enter a title that appears at the top the display. |
Title Background | Select a color for the title background. |
Stays Open on Page Change | Leave the popup window open when the user clicks something that opens a different display. Available only for Popups. |
Stays Open After Losing Focus | Leave the popup window open when the user clicks a different display. Available only for Popups. |
Left | Enter how far from the left of the layout the display should appear, in WPF units (device-independent pixels). Available only for Canvas layouts. |
Top | Enter how far from the top of the layout the display should appear, in WPF units (device-independent pixels). Available only for Canvas layouts. |